State testing season is officially upon us. A time of year that every teacher would prefer to be eliminated from the calendar, but the reality is that it’s part of our job. I’m going to tell you what I tell my students: this is not a defining moment. Sure, these tests are used for defining us as teachers and they are used for defining our students, but we are not the total sum calculated in that score.
Does that give us permission to blow off the test? No, because the reality is that this state test is not going to miraculously disappear. We aren’t going to wake up one morning and hear that the governor has declared all state testing canceled. As much as we all would love for this to be the scenario!
So if you can’t beat ‘em, join ‘em!
Did you know that I sat on the Ohio AIR content advisory committee?
If I couldn’t make the test go away then I needed a way to understand it better. Once Ohio ditched the PARCC they started new teacher advisory committees to piece together the AIR test. Apparently, this is always the process of curating a standardized test.
A small committee of about 20 -25 teachers who have at least five years of teaching experience in that grade level work to decide on content. Teachers are chosen from a variety of districts around the state to represent the different demographic areas as well. All of the teachers chosen must apply for the committee.
The job of the committee is to ensure that test questions are aligned with grade level standards. Each question is presented as an assessment for a specific standard and if we feel the question doesn’t do that it can be rejected. There would have to be what’s called a “fatal flaw” within the question for that to happen. Most of the time a simple revision can fix a question.
Being an active participant and hearing this process helped me better understand assessments. It didn’t sway my opinion of how our state chooses to use these tests in determining teacher effectiveness, although not much would change my opinion on that. When it comes to state testing it’s too simplistic to say you agree or disagree with it. There is a need for evaluating student knowledge based on state standards and until there is a better way I will do what I can to help my students be better test takers.
Many students will have to sit for exams in order to further their careers so I like to look at test prep as if it’s a reading genre. Ultimately, every test is a reading test. Determine what they want you to show that you know and find the right answer. In my slide presentation on preparing for the Ohio AIR test, I go into specific detail about how students can use this to their advantage. You can also read more about lesson ideas I use for test prep here.
There are also environmental aspects to consider when preparing for a state test that can help students have a greater advantage. Here are six ideas for preparing your classroom for testing season.
1. Scent: Did you know that cinnamon helps to awaken the brain? In a brain science professional development we learned this little tidbit of information. The presenter did mention that it can’t be fake cinnamon like a plug-in or spray or even melted wax. Her suggestion was to sprinkle a little on a few plates and place those around the room.
2. Look: Most states mandate that any posters come off the wall if they could help the students. Plan to do this a week in advance so students aren’t throw off by the “new” look of your room on the day of testing. This could also make for a good review. Ask students to recall where anchor charts hung and what was on them.
3. Feel: Suggest to your students that they wear their brightest color clothing! Bright colors evoke positive feelings and stimulate the brain. It’s also better to wear clothing that it’s too comfortable. Sweat pants and sweatshirts can make a person feel too relaxed and sleepy. I like to talk about the idea of dressing for the job you want, only I change it to dressing for the score you want.
4. Taste: Peppermint is a flavor that helps to awaken the brain and senses. We buy or PTO donates bags of the peppermint hard candies for students to suck on while testing. Cinnamon gum can also have the same effect. What you eat can also make a difference. Don’t forget to tell your students the importance of a high protein breakfast the morning of each test. High protein – low sugar. Protein allows energy that is prolonged, while sugar will give them a jolt then crash before testing is even over!
5. Sound: Silence can be deafening for some kids. They need opportunities to practice prolonged silence. Extended silent reading is great practice. Even a computer task without headphones. These are especially important if the norm in your classroom is background music and headphones during independent work time.
6. Emotion: One final tip that could help your students make a personal and emotional connection to a very impersonal assessment. Test dedications: it’s the same concept as athletes dedicating their performance or the dedication page at the start of every novel. Ask students to think about someone who has helped or encouraged their education. Have them write a small paragraph about why they deserve this honor then paste their picture next to it. Have students hang their dedication where they can see it while testing.
If you’d like a free downloadable test dedication printable simply add your email below. You’ll get access to this and many other free printables in our growing resource library.
Do you have other ways to help students prepare or feel ready for the test? Share your best test-taking strategies in the comments!
A Christmas Carol is arguably the most widely known Dickens story of all time. Made into movie after made-for-TV movie, this story has been told over and over again. Each year the 7th-grade language arts teachers dust off our textbooks and read this play with students. We all know that as much as we may love a story it can become boring eventually. Here is an idea to breathe some life back into teaching A Christmas Carol plus teach students the art of persuasion.
Before they changed our standards and took away persuasive writing it was a staple writing assignment essay. I enjoyed teaching students about the techniques of persuasion and we usually did this in the form of a letter to parents. We would write parents a letter persuading them to buy a particular item for Christmas. Some of you may have just cringed at that last sentence.
YES, with more experience as a classroom teacher I started to see how this assignment was troublesome. Many students came from homes where Christmas was not celebrated or presents were not part of the budget or the requested gift was simply out of the question. So I needed to take a different approach. That’s when I created the Scrooge Speech Contest.
We always read A Christmas Carol at the start of December. Sometimes the play version from our textbook or the Scope Magazine version. In the years I had advanced students we read the actual text. In the years I was scheduled for co-taught classes we read a shorter, illustrated version. Either way, every version shares the story of how Scrooge changes from a tight-fisted miser to a man who celebrated Christmas with all his heart. At the end of the story, we learn that he did give money to the men who asked for donations and he became a benefactor to the Cratchit family. This was the perfect opportunity to change our persuasion writing assignment.
The new assignment was to convince Scrooge that the charity of your choice should receive his donation this Christmas season. A chance to teach writing and speaking skills all in one.
The Assignment
Students started by choosing a charity. The first year I let this be a free for all. That was a huge mistake! Students had a terrible time researching and we ended up with 20 speeches about the Humane Society. I must have had a lot of animal lovers that year. The problem was students weren’t branching out to see what charities were even possible they just went with what they knew.
The next year I created a list. This list has grown since spending time with a number of charities through my World Race mission trip. The list also became an opportunity for me to share the work I did overseas. The list, which is a Google Doc of links to the charity websites, helped for the most part. I still had students choosing what they knew. This is not necessarily a problem, however, on the day of speeches, it’s hard for the class to sit through the same speech over and over again. That’s when I initiated a draft day.
Students were given access to the list of charity links and they had 10 minutes to investigate their options. This also gave me the chance to strike up a conversation with an individual student and help them choose a charity that might fit with their passions. I could steer the animal lovers to other charities like the World Wild Life Fund or Puppies Behind Bars. Once students found a charity they connected with they would type their name in the shared spreadsheet. I kept the spreadsheet for all 3 of my classes so that no student had the same. This made the speech day more bearable for me. There are enough charities in the world so why not learn about as many as possible?
Research and Writing
The next few days students learned a few basic research skills for navigating a website. Check off any digital literacy standards you have for that day. They would keep track of their research in these Digital Notecards I designed. Once they had a full picture of the charity they began working on their presentation. Most organizations these days have very detailed websites. Students can usually find all they need for the presentation on the one website.
It’s important to take this opportunity to teach students the proper etiquette for giving a speech with a slide presentation. Middle schoolers tend to write everything they want to say on the slides and then proceed to read those slides to the audience. As we all know this is poor form. I would model for them what a presentation should look like by presenting my favorite charity Remember Nhu. Sharing this charity allowed me to present personal testimony from working with this organization and the impact it made on my own life. When students see this they tend to want a personal connection to the charity they picked. That is a beautiful moment! One year a student shared how Wyld Life changed things for them and gave them hope for a better future.
Presentation Day
One-by-one students present their charity to the class. Sharing an overview of the charity, who are impacted by the organization, a major project currently taking place, and how Scrooge’s contribution will make a difference. If the charity has a short introduction video that students can use for the overview section I do allow them to share the video. I also make stipulations that they can only include 1 video and the whole presentation cannot exceed 5 minutes. As students present, I find it easiest to assess their speech in a pre-made Google Form. This allows me to give them a point value for each section and provide feedback. It also makes entering final scores from the spreadsheet super quick.
Take it up a notch
Here are a few ideas I’ve used to really take this project to the next level. Since my students are blogging in class they have turned their presentation into a blog post. Another option would be a class Google Site where students could upload their slide presentations to be shared publicly.
Another fun way to take this up a notch is to collect actual funds for the speech winner to donate to their charity. My second year implementing this project we raised $100 and we were able to donate that money in the student’s name. It certainly makes giving a very real experience. Especially if a student has never had the means to give. I set a mason jar on my desk to collect change and posted to my Facebook friends that we were doing this with a way for them to help. There are a number of ways that you could go about doing this now and possibly generate a large enough donation to allow several students to make donations in their name. It can be hard to choose just one. Another option, rather than having to choose, could be to draw from a hat or randomizer.
If you host a Scrooge Speech contest this Christmas season I’d love to hear how it goes and see any links if you decide to share. Have any other ideas for how to make this project awesome? Share them in the comments.
Teachers have been preparing for their year most of the summer and the excitement builds to crescendo the day students walk through our doors. The last lesson plan we really want to follow is to stand at the front of the room and go through a massive list of rules. Some teachers will choose to do this. You can be different and set a tone of learning on the first day with this lesson plan.
Often times the first day of school will not follow your regular time schedule. This makes for difficult lesson planning to figure out what you can fit into the usually short time you have with these new students. Take advantage of this unusual timetable and let it work to your benefit. Even if you run a normal schedule this plan will be one that students will enjoy. You will also learn a lot about your new kiddos!
Set a tone of learning
Show them your books. There will be plenty of time to go over how to turn in papers and where to return supplies and the consequences for bad choices. Let your students know that on day one your priority is their learning. Sharing your books and the passion you have for them will make a strong first impression.
Consider how much information these kids are taking in on the first day. Nearly every teacher is going over some part of the handbook or handing out their list of rules and expectations. I used to be that teacher. I would write them a letter that talked all about my expectations for being a student in my classroom. We would read it out loud together and it would serve as a model letter which they would replicate for homework that week. Now multiply this by the number of teachers an average middle schooler or high schooler sees in a day. That’s a lot of information to take in within a seven-hour day.
Get them talking
The first day of school marks a change in the social scene hub. Wherever the crowds were gathering over the summer this all changes on the first day of school. Kids are excited to see which friends are in their classes and where their locker is located and who they will sit with at lunch. The kids are much more focused on their social scene day one then they are about the expectations teachers are explaining to them. So why not let them be social? As long as they are talking about books, let them talk.
Listening in on these conversations will provide you with valuable information. Pay attention to who resists and who dives in with both feet. Your resistors are now on your radar! Those who dive in and start talking about the books in the stacks they’ve already read will be your marketing committee. Use them to share book talks and favorite reads for those who aren’t so excited about reading. Find more ideas about the readers you’ll be meeting in your middle school classroom in this guest post I wrote for the Booksource Banter blog.
How to share your books
This is an activity that I call Speedbooking. It’s similar to the concept of Speed Dating. To prepare for this activity you’ll want to place seats in a circle or have a fixed pattern for books to travel. At each student seat place a stack of 4-5 books. Choose a good cross-section of your library. Be sure the stacks are a mix of books. Pull some of your most popular, “fly off the shelf” titles. Don’t forget about the books in a series. Research shows that students are more likely to continue through a series. So including these books will be good for your reluctant readers.
When students arrive in the classroom tell them that they’ll have time to look at the books, but not yet. Start with a conversation about how to choose a book. Ask them to give you all the ways they make an informed decision about choosing a book to start reading. Some of the most common answers might include reading the back of the book (great place to teach the word synopsis vs. summary), read the first few pages, looking at the cover. Another good teachable moment to mention that judging a book by its cover is ok when it’s an actual book. A few answers that don’t often come up but are worth mentioning are to choose a favorite or trusted author, read in the middle to look for words that might be too hard, look for key aspects that identify the genre. Keep this talk to 10 minutes and it helps to make a list on the board or in an anchor chart.
Now they are ready to start looking through the books. In order to keep track of the books they like try my record sheets. One is a running record and the other is meant to replicate Instagram. This can be used for your visual students. Often the struggling readers have a hard time finding books they like or that on their reading level. They might feel pressure to write titles down because those around them have several on their list. Giving them the option to draw and use the Instagram template gives them something to keep their hands and minds busy if the stack isn’t for them.
Each round takes about 90 seconds. It helps to set a timer. The kids will catch on to the process which allows you to listen in on conversations happening or strike one up about a book you might recommend. Ideally, you’ll have time to allow all the stacks to make it around the circle.
Update: Speedbooking during the pandemic
So much of what we always do is now not possible. It makes me sad that I’m not able to allow my new group of students to touch books and flip through them on the first day of school. I also don’t want to give up this moment to highlight the importance of reading and start by offering my students their choice of a book to read. Thankfully some other very creative teachers started designing Bitmoji classrooms and reading rooms.
This idea inspired me to create a virtual option for students to choose their books. I chose my stacks of books like I normally would and found images of each of the book covers. These were randomly placed on the bookshelves then linked to their Amazon page. This will allows students to read the synopsis, as well as, reviews for each book. They will still keep a future reading list while exploring the different titles.
The next day students will choose and check out the book they would like to read. I have been given permission to allow book check out as long as collected books are wiped down and sit for 72 hours before returning to the shelves.
Although your shelves and mine may not be the same feel free to use my slides as templates to create this activity for your students.
After all your classes have been through the stacks and have created a Future Reading List be sure the lists are placed where they can be referenced often. Most likely your schedule will only allow for this activity to take place. The following day is a great opportunity to show students your book check out system. If you currently do not have one or are looking for a free system that is digitally tracked read my post about using Classroom Organizer. If your library needs some “beefing up” check out this post about reading recommendations for middle and high school.
Share your first day of school routines that have helped you get to know students right away while setting the tone for learning. I’d also love to hear from anyone who tries this plan!
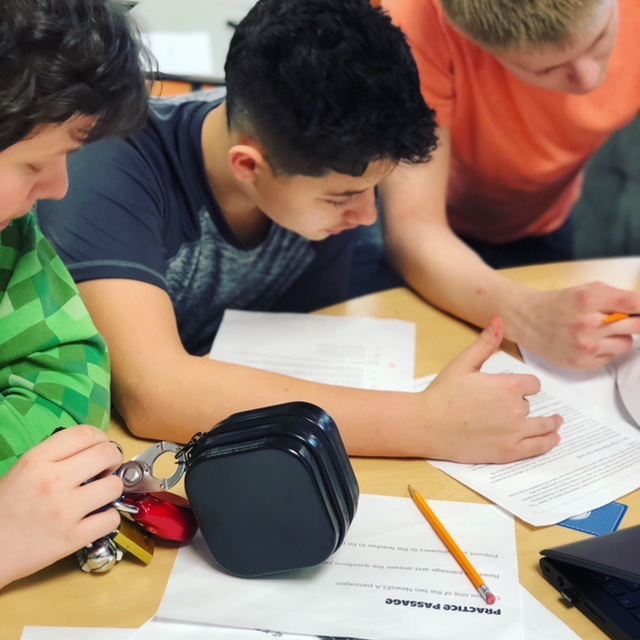
When it’s test-taking season and the kids have worked so hard, they need a day to use that knowledge for fun! Rather than more practice with multiple choice questions, try a BreakoutEDU session.
What is a BreakoutEDU?
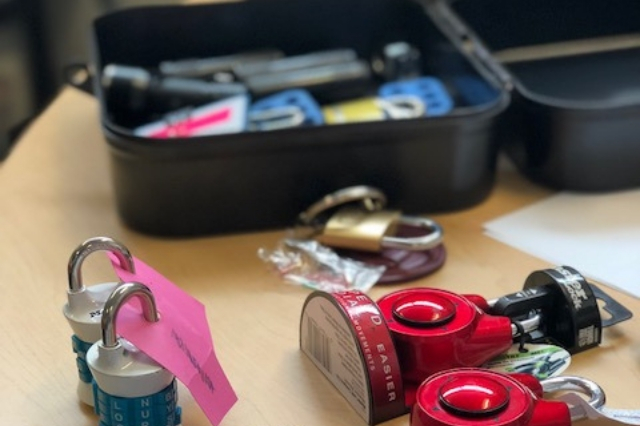
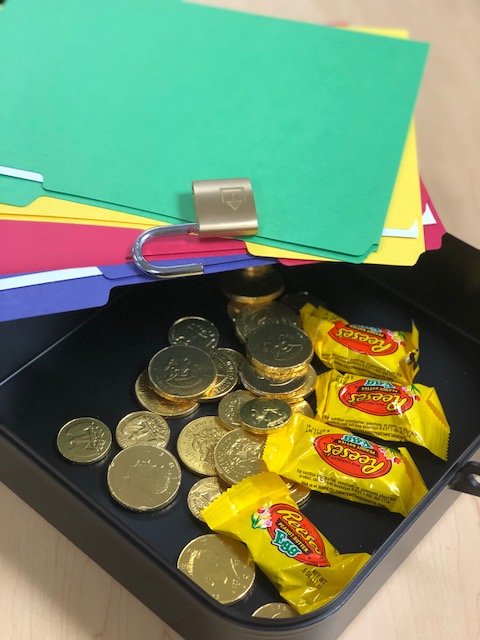
The best way to describe it is to compare it to an Escape Room activity. In a similar fashion, students are working to determine the code that will help them unlock the box. Creativity is the name of this game! The purchased kits come with a box, multiple kinds of locks, a hasp (for adding multiple locks to one box), Hint cards, a deck of reflection cards, invisible ink pen, UV flashlight, red lens viewer, and a blank USB. With all of those options, there are a bazillion ways to create tasks for students to discover a code to unlock a lock. For the ELA teachers, this would go great in a mystery unit, for Science teachers may be a forensic unit. Honestly, there are endless possibilities here.
How did I do this?
After posting a series of photos and videos to Instagram, a number of teachers contacted me about how to do this. My first suggestion is to take a look at their website. If you’re completely new to this idea their website is the place to start. Fortunately for me, our librarian had all the tools and knowledge I needed to get started. She was able to provide me with the tools and some ideas for creating the session.
If you are choosing to create your own, start with the material. Decide what knowledge the students will need to know in order to complete a task. This works best for the end of unit review or test preparation. I had shared a test prep slideshow at the start of the week, which you can find in my Teachers Pay Teachers store bundled with a Jeopardy game.
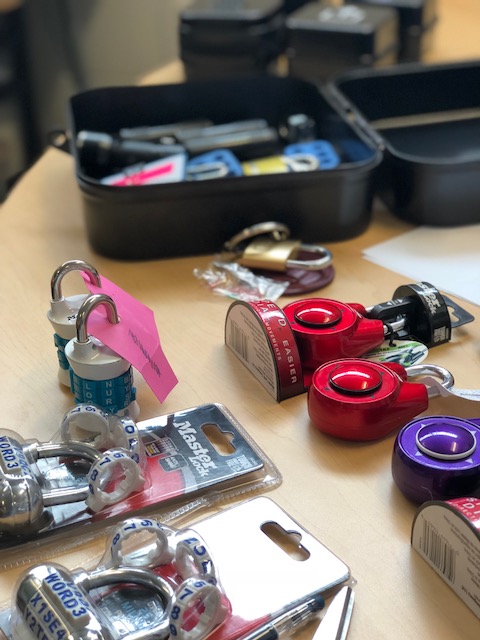
Next, you will need to create the tasks associated with each lock. I chose to make this pretty challenging, so I had 6 total locks on each box. This is where you can get creative! Choose if you’d prefer tasks to open locks or have them moving around the room to find clues that will lead to opening a lock. If trying to figure this all out sounds daunting, it did to me at first, be sure to check out the website for complete session ideas. To organize myself, I laid out each lock and gave it a sheet of paper. We used 2 key locks, a 3 digit number lock, a 4 digit number lock, a 4 letter word lock, and a directional lock. I started with the number locks. Looking at my materials there were a few questions I could ask that created a number series. You can also use ciphers to translate letters into numbers. The key locks were made from the most complex material. I asked students to complete a task that needed to be checked by a teacher and if correct they were awarded the key. To add a little more fun to this you could also include a riddle that would lead them to a hidden key. The letter lock can be used as a four letter word answer or you can use multiple choice questions. Tackling the directional locks took some thinking, thankfully my co-teacher came up with a great idea.
In order to make the directional locks work we had to create a series of directions by color coding answers. On the board, I had the directions written in the color that answers were highlighted with on a slide show. Students matched the right answer to the color and direction to create the correct series. For example, if the correct answer was highlighted with blue then students had to match that to the blue word UP that I had written on the board. I didn’t tell students what the words were for, they discovered this on their own. This is part of the critical thinking that students will need to use. Ask them to pay attention to their surroundings for finding answers.
Once they had all the locks opened the small box held a riddle that leads them to a key hidden behind one of my anchor charts. I did this so that there would be only one group to win the treasure chest of candy. My classes this year are very competitive, so it worked to my advantage to make only one winning group. Each of the small boxes could easily contain a “prize.”
Can I make my own?
Now, you may have already visited the website and noticed the price of one kit ($150). Most teachers don’t have the money to spend on one kit so let me suggest a few ideas for making this happen. First, you could always ask the team or grade level to split the cost. In our district, we are given a supply fund, but I know this is not the case for all districts. Our librarian used her book fair funds to purchase a school kit for our building to use. Then a second kit was purchased through Title I funding that we receive. If none of these are options for you, consider writing a grant. The uses of a kit such as this are endless and adaptable for any grade or subject. If you still aren’t able to purchase a name brand kit, I’m certain you could find locks and a box at any dollar store. The quality may not be that great, which makes the possibility of cheating greater. Start with a discussion on integrity and it should work well.
Whether you purchase a name brand BreakoutEDU kit or choose to create your own, you won’t regret bringing this fun activity into your classroom. Comment below and let us know how your Breakout session goes!
This summer my classroom library got a makeover. Mostly because it gained another 1,000 books! I’ve taken over the classroom of a retired teacher who left her beloved library behind for my students to continue to enjoy. I’m beyond grateful for this kind of gifting, and I’m having a fabulous time getting to know some of the new books. I can’t wait to introduce them all to my students.
Some of the links found in this post are affiliates. This means if you make a purchase after clicking through we will receive a small compensation at no extra cost to you. Thank you in advance for your support and please know that we only endorse products we use and love.
3 Engaging Ideas to Share Your Classroom Library
Let me share a few ways I’ve discovered to help share all the different books living in my classroom library.
Show and Tell Book Style:
This is exactly what it sounds like, ask students to find a book in your library that they have read and enjoyed. Give students a few minutes to think about or write what they remember liking about the book and two highlights from the story. Students can then share them with the whole class or in small groups for a less intimidating audience.
Sail the Stacks:
This activity takes a little set up and works well when desks are in small groups. Start by creating stacks of 8-12 books of the same genre. Choose books that tend to be popular within the genre and are great representations of the genre. You could add genre labels to each table, or simply place a sticky note on the stack. Write on the board or announce, “If you were shipwrecked on an island and found a crate of books that contained only one genre of books what genre would you want it to be?” Have them “visit” that island and allow them a few minutes to talk about the stack. Add a “rowboat” and allow them to travel to a different island.
Speed Booking:
It’s similar to the concept of Speed dating. I always like to share this funny eHarmony commercial to introduce the activity. This activity also takes some set up. I have tried this with several different desk formations, but a circle works best.
We start by talking about the things that “attract” us to books. That leads to a discussion about how we make the decision to read the book. We write the list of options on the board. The list usually includes ideas like the cover (kids almost always say this first), favorite authors, reading the back to see if it spikes interest, reading a page in the book and a number of others.
You’ll want to have pre-stacked books on student desks in no particular order. I like to choose books that get a lot of traffic throughout the year, books that I’ve purchased over the summer, or books that I think often get overlooked. Obviously, I can’t show them all my books, but this is a great way for them to get a cross-section of what’s available. So be sure to provide all the different genres represented in your library, as well as reading levels.
Students are then given a sheet to record any titles they find interesting. This sheet is kept in their binder so when they finish a book they have a place to go for ideas about what to read next. The idea for keeping a Future Reading List came from Donnalynn Miller‘s books, The Book Whisperer and Reading in the Wild. Whenever a student is taking their good ‘ol time searching for a new book I like to direct them to their list to speed up the process.
If this sounds like something you’d like to do in your classroom find all of the directions and forms to print in my Teachers Pay Teachers store. I’ve updated this product to include a record sheet for the more visual learners in the form of an Instagram feed. Students can draw or copy the book cover into the square and then caption why they think it’s interesting. This keeps students occupied when there aren’t interesting books in the stack for them.
Do you have a great idea for sharing books with your students? Share them in the comments below.
Hi there!
I’m Carly, a former middle school now high school teacher and mom of 2 rambunctious kiddos.
Teach.Mom.Repeat. is here to help you find the solutions you need to be the best in both of these important roles. Let me help you with lesson planning and managing life at home.
Resources you can use in your classroom and at home today!
Would you like to…?
Join our TeacherMom tribe…
and make life easier!
Solutions sent to your inbox that you can use in the classroom or at home today. Solutions that will save you time. Solutions to help keep school at school so you can enjoy being home.